


After you launch your website, you will want to track the performance of your site and you also want to make sure your site is in compliance. Here are a few key steps and resources that you will need after launching your website.
Track Your Website After Launching
If you want to be able to track activity on your website (like page views and visits for example) after you launch your website, you have to add a Google Analytics code to your Showit website. It starts by signing up for Google Analytics.
Signing up for Google Analytics
- Go to https://analytics.google.com
- After you log in go to Admin on the left-hand side, Click Create, and then select Account.
- When you are providing your account name, use you business name and make sure you have the Editor role.
- Then you will click Next to add the first property to your account. The property will be your website.
- You can follow through answering the questions that are prompted to you. Then you can continue to the next step of adding a data stream.
- At this point you want to enter the URL of your website and enable enhanced measurement. This will allow you to collect page views among other things.
- Then you can click Create stream.
After you have your Google Analytics account and data stream, you can follow the steps that Showit provides to add your Google tag to your Showit website through the Site Settings. Don’t forget it will take a little while for your information to show in Google Analytics.
Another Must-Have Google Tool After Launching Your Website
You definitely want to sign up for Google Search Console. In Google Search Console you can see where you are ranking on Google, search terms that are being used, which pages are coming up, and trends as well! I use Google Search Console a ton for my own business and find it easy to use. It’s pretty quick to start using it:
- Go to Google Search Console and click Start Now
- Log into the same account you used to sign up for Google Analytics
- Then you want to connect your property.
When you see this screen below, I would suggest using the URL prefix to verify your property. Enter your URL in the box on the right. Be sure to include the https:// before the URL.

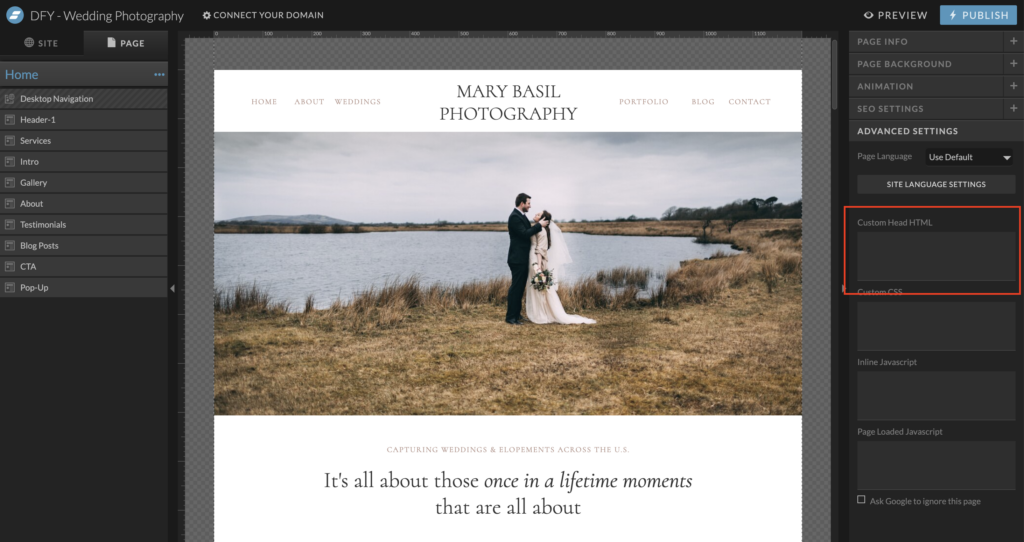
When you click continue, you will come to the screen below. I would suggest using the HTML tag to verify the property. Click the arrow to open the box and view the code. Then click copy.

Go back into Showit and click on your Home Page. Then go to Advanced Settings on the right, and paste the code into the section that says Custom Head HTML. Then click Publish on your Showit account.
When you return to the Google Search Console browser, it should verify your property. At this point, you will most likely not see any data. That’s ok! It may take a few days for Google to start bringing in the data.
At this point, you can now submit your sitemap. Basically a site map is the structure of your website and you are telling Google that it exists. Eventhough Showit automatically submits a site map when you Publish your site, sometimes it’s nice for you to let Google know yourself after you launch your website.
For your main site:
- While you are in Google Search Console, go to Sitemaps on the left hand side
- Enter your URL into the box with the additional /siteinfo.xml at the end (yourdomain.com/siteinfo.xml)
- Click Submit
For your blogs:
- You can follow the same steps above but enter the URL yourdomain.com/sitemap_index.xml instead
- You want to reference Showit’s help documents when you are using Yoast or Jetpack for your blog
Now you have setup tracking on your brand new website and submitted the sitemap. So Google knows who you are, and you can start tracking your progress!
Get Legal After Launching Your Website
It is SO important to make your site legal. A lot of people know what they “should” have on their website but don’t know where to start. After you launch your website, it is the best time to take the necessary steps to protect yourself. Here are a few businesses that I use on my own website that I trust:
TERMAGEDDON
I use Termageddon for my terms and conditions, privacy policy, and disclaimer policies. They make it SO easy and the cost is extremely affordable (especially compared to what you would pay a local lawyer!). Plus they actually auto-update the policies if anything changes! I’m sure you are thinking “what do I even need for my website?!”. Here is a quick guide:
- Do you have a contact form on your website? Then you need a Privacy Policy.
- Do you link to third party websites? Then you need a Terms and Conditions policy.
- Do you offer any type of affiliate links? Then you need a disclaimer.
- Do you use cookies to track users? Then you need a cookie policy. This website will actually tell you which cookies and tracking technology is collecting data on your website!
Termageddon really makes it easy to set up all of your policies and embed them on your website. They take you step by step and even have little question marks on the questions if you have no idea what they are referring to.
Use my link to sign up with Termageddon, and then send me your policies and I will put them on your website COMPLIMENTARY for you!
ACCESSIBE
Making sure your site is accessible is one of those things that may go under the radar. It might not seem “important” until something serious happens. A few statistics to make you think about it:
- The average settlement is around $30,000 for not having a website accessible and/or compliant
- 2022 broke the record for ADA lawsuits and demand letters; 3,250 lawsuits were filed, representing only 3% of demand letters, as 97% are settled before trial. This means that more than 100,00 business owners received demand letters in 2022 for having inaccessible websites.
As a website designer I thought I could actually just make my website accessible on my own. Then after running some reports I realized it was way over my head, so I looked into Accessibe. You just embed something on your site and then it’s done! SO easy and so stress-free, it was worth it.
Also – you have the ability to get a tax credit for your business too!
Use my link to sign up for an annual subscription with Accessibe. I will receive a commission if you use my link, but I would embed the widget on your Showit website complimentary as a thank you! Also, if you would like me to run a free audit on your site to see your current ADA compliance, just send me a message and I would be happy to! Clearly you can see my website wasn’t before accessiBe – now I don’t even think about it!

A Website is Never Done
These are just a few steps you can take after launching your website but just remember a website is never done! You can always use tools like UberSuggest to improve and track your SEO performance. You can use a Showit website designer (I know a great one, wink wink) to keep your website updated. At this point, you have launched your website so just focus on enjoying the celebration and don’t forget to share about your launch on social media!


